vent window
Moderator: FORDification
-
gottabe71fe
- New Member

- Posts: 20
- Joined: Wed Oct 18, 2006 11:17 pm
- Location: Arkansas
vent window
does anybody know if a company makes a kit to remove the vent window and make it a soild glass in the 69-71
-
lazyj70

- New Member
- Posts: 140
- Joined: Thu Jul 13, 2006 3:44 pm
- Location: Arkansas
re: vent window
There is someone who does this. I saw the kit on Ebay the other day, but I don't remember who it was. Might try an Ebay search.
2008 F-350 Lariat Crew Cab 4X4 Western Hauler
1970 F-100 Ranger XLT.
1970 F-100 Ranger XLT.
-
FORDification

- Site & Forum Admin

- Posts: 8050
- Joined: Sun Jul 11, 2004 12:52 am
- Location: Kansas, Wellsville
- Contact:
re: vent window
If there's a kit to do this, I haven't seen it. I'll have to take your word for it that they exist. However, it would still involve some cutting/drilling on the door. The area where the door hinge bolts to the door extends into the door enough to prevent a full piece of glass in there, and would have to be removed. I've been giving this some thought myself, and here's what I've come up with. I'm going to include several large pictures here for the necessary visuals.
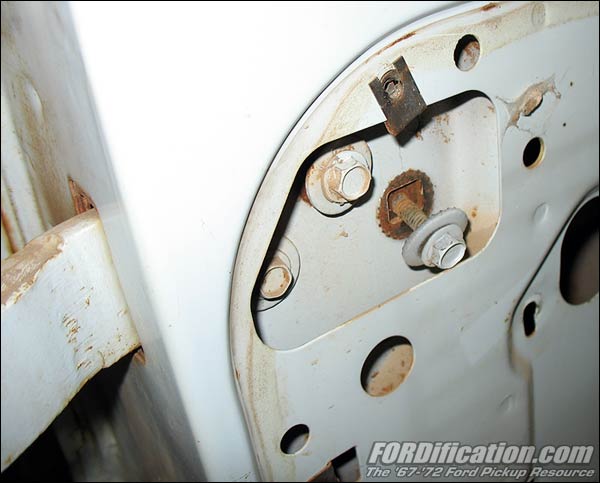
OK, here's a shot of the hinge installed on the door:
FIG. 1
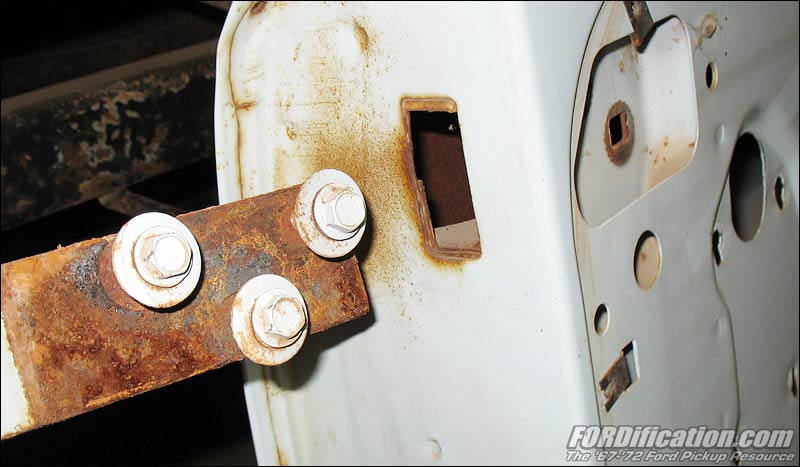
....and here's what you see after removing the hinge:
FIG. 2
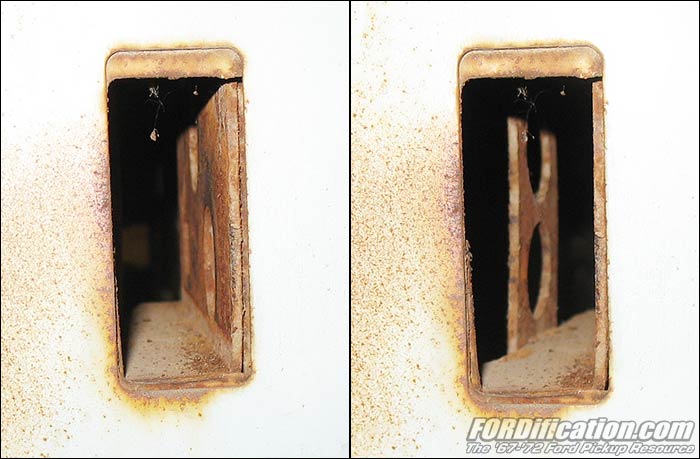
...and another view:
FIG. 3
Those preceding three pictures were of the passenger door (simply because they came out the best). Now we move to the driver's door and hinges for the remainder of this. Here's a composite view of the inside of the left door...the left part of this picture is looking up through the bottom after removing the door panel, and the right side of this picture is looking down from the top, through the glass opening:
FIG. 4
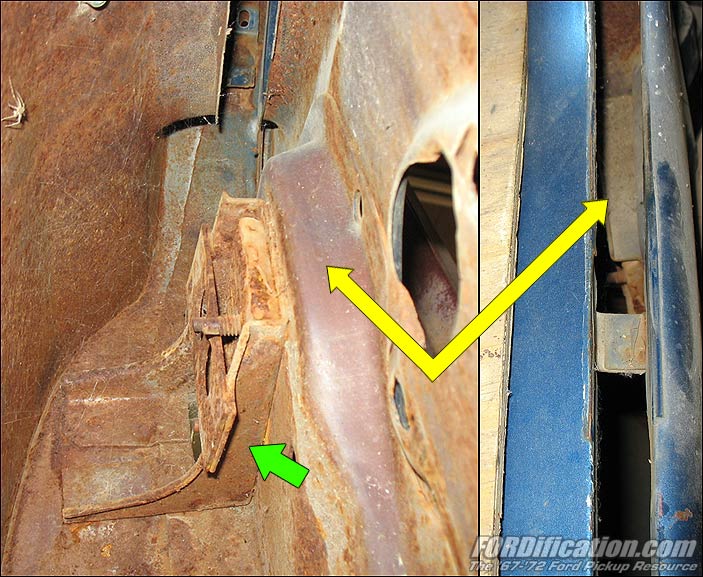
You can see how the steel support bracket / cage (labeled with a green arrow) extends too far into the door to allow for a one-piece glass. So...step one would be to make enough room for the glass by removing this cage. Since it's just spotwelded into place, the easiest way by far would be to simply drill out the spot welds.
Keep in mind I haven't actually tried this, but from close scrutiny I believe there would now be barely enough room for the glass to fit in the door and clear the hinge pocket (marked with a yellow arrow). So the next thing to consider would be....how the heck do I now install the hinges??
Two ideas come to mind. The first would be to rework the hinge (offsetting the arm) to allow the hinge arm to bolt to the outside of that pocket. Here's a quick Photoshop hack I did of a hinge to show what I have in mind:
FIG. 5
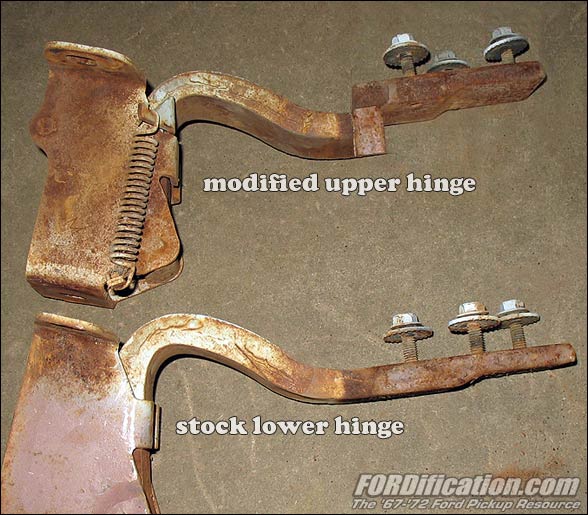
All you'd be doing is offsetting the arm to fit against the outside of the pocket rather than the inside. And of course you'd have to drill new holes and run the bolts in from the inside. Obviously, you'd also have to cut a new slot in the door for the hinge arm to enter, and you'd have to weld the old slot shut.
The other idea for mounting the hinges simply involves cutting the arms off and welding some plate steel onto the end of the stub, which would then be bolted to the door. Here's another Photoshop hack to show the basic premise I have in mind:
FIG. 6

This method of plating the hinge would also be necessary if I'm wrong about the glass clearing the hinge pocket. If it's determined that the hinge pocket does indeed interfere with the glass or is simply too close for comfort, then you could just cut that pocket completely out.
Now that the door is mounted, you can complete the task. On the right side of Fig. 4 above, you can see how the outer and inner door skins have a thin support brace welded between them for support. Obviously this would have to be cut out. In the kits for Ch*vy trucks there's a chunk of angle iron included to attach along the skin to help reinforce it (I'm not exactly sure where/how it's mounted). Something similar would have to be used here on ours.
Then, of course, there's the matter of fabricating the forward glass runner, but I wouldn't imagine it would be terribly difficult to modify (cut down) the original runner and tack into place.
The final step would be the weatherstripping. I haven't progressed far enough into this research to find out if one could get window fuzzies that are substantially longer, but I'd almost bet you could get those, even if you went to the manufacturers of the Ch*vy kits and got the pieces from them. The remaining perimeter trim should be available in bulk rolls, but again I haven't researched that yet fully.
So....there you have it. I spent time coming up with the above scenerios simply because I wasn't aware of any aftermarket kits for this for our trucks, but if anyone else is, please post a link. And of course, since it wouldn't be the first time I was accused of trying to re-invent the wheel, if anyone has any input into what I'm thinking (good or bad), let me know. I'm always open to ideas and alternative courses of action.
OK, here's a shot of the hinge installed on the door:
FIG. 1
....and here's what you see after removing the hinge:
FIG. 2
...and another view:
FIG. 3
Those preceding three pictures were of the passenger door (simply because they came out the best). Now we move to the driver's door and hinges for the remainder of this. Here's a composite view of the inside of the left door...the left part of this picture is looking up through the bottom after removing the door panel, and the right side of this picture is looking down from the top, through the glass opening:
FIG. 4
You can see how the steel support bracket / cage (labeled with a green arrow) extends too far into the door to allow for a one-piece glass. So...step one would be to make enough room for the glass by removing this cage. Since it's just spotwelded into place, the easiest way by far would be to simply drill out the spot welds.
Keep in mind I haven't actually tried this, but from close scrutiny I believe there would now be barely enough room for the glass to fit in the door and clear the hinge pocket (marked with a yellow arrow). So the next thing to consider would be....how the heck do I now install the hinges??
Two ideas come to mind. The first would be to rework the hinge (offsetting the arm) to allow the hinge arm to bolt to the outside of that pocket. Here's a quick Photoshop hack I did of a hinge to show what I have in mind:
FIG. 5
All you'd be doing is offsetting the arm to fit against the outside of the pocket rather than the inside. And of course you'd have to drill new holes and run the bolts in from the inside. Obviously, you'd also have to cut a new slot in the door for the hinge arm to enter, and you'd have to weld the old slot shut.
The other idea for mounting the hinges simply involves cutting the arms off and welding some plate steel onto the end of the stub, which would then be bolted to the door. Here's another Photoshop hack to show the basic premise I have in mind:
FIG. 6
This method of plating the hinge would also be necessary if I'm wrong about the glass clearing the hinge pocket. If it's determined that the hinge pocket does indeed interfere with the glass or is simply too close for comfort, then you could just cut that pocket completely out.
Now that the door is mounted, you can complete the task. On the right side of Fig. 4 above, you can see how the outer and inner door skins have a thin support brace welded between them for support. Obviously this would have to be cut out. In the kits for Ch*vy trucks there's a chunk of angle iron included to attach along the skin to help reinforce it (I'm not exactly sure where/how it's mounted). Something similar would have to be used here on ours.
Then, of course, there's the matter of fabricating the forward glass runner, but I wouldn't imagine it would be terribly difficult to modify (cut down) the original runner and tack into place.
The final step would be the weatherstripping. I haven't progressed far enough into this research to find out if one could get window fuzzies that are substantially longer, but I'd almost bet you could get those, even if you went to the manufacturers of the Ch*vy kits and got the pieces from them. The remaining perimeter trim should be available in bulk rolls, but again I haven't researched that yet fully.
So....there you have it. I spent time coming up with the above scenerios simply because I wasn't aware of any aftermarket kits for this for our trucks, but if anyone else is, please post a link. And of course, since it wouldn't be the first time I was accused of trying to re-invent the wheel, if anyone has any input into what I'm thinking (good or bad), let me know. I'm always open to ideas and alternative courses of action.
____| \__
-O-----O- Keith
'67 F-100 2WD SWB ~ '69 F-100 4WD SWB w/7" chop ~ 1975 F-250 Ranger XLT Supercab Camper Special

My '67 restoration video
-> Posting and you! <-a MUST watch for all!!
-O-----O- Keith
'67 F-100 2WD SWB ~ '69 F-100 4WD SWB w/7" chop ~ 1975 F-250 Ranger XLT Supercab Camper Special
My '67 restoration video
-> Posting and you! <-a MUST watch for all!!
-
lazyj70
- New Member
- Posts: 140
- Joined: Thu Jul 13, 2006 3:44 pm
- Location: Arkansas
re: vent window
I know I saw this on ebay. It might have been just a one pc. glass then you had to do the mods. I don't know, but it had a picture with the glass installed on the truck with no wing vent. I didn't send a whole lot of time looking it over because it wasn't something that appealed to me. 
2008 F-350 Lariat Crew Cab 4X4 Western Hauler
1970 F-100 Ranger XLT.
1970 F-100 Ranger XLT.
-
jzjames

- 100% FORDified!

- Posts: 1785
- Joined: Sun Jan 09, 2005 2:59 pm
- Location: Washington, Windy Point
re: vent window
Kieth your fabricating plans seem pretty straightforward. The first, offsetting the upper hinge to face with the outter side of the hinge pocket was what I was thinking also. (You would offset exactly the thickness of the hinge arm plus the thickness of the pocket sheetmetal, right?) Then you would have to countersink the bolt heads somehow on the inside by the looks of it (for the glass to clear it).
Invent a kit, patent it and make a buck......?
Invent a kit, patent it and make a buck......?
-
FORDification
- Site & Forum Admin
- Posts: 8050
- Joined: Sun Jul 11, 2004 12:52 am
- Location: Kansas, Wellsville
- Contact:
Re: re: vent window
Yes, that's exactly what I was thinking too.jzjames wrote:Kieth your fabricating plans seem pretty straightforward. The first, offsetting the upper hinge to face with the outter side of the hinge pocket was what I was thinking also. (You would offset exactly the thickness of the hinge arm plus the thickness of the pocket sheetmetal, right?)
No, the bolt heads would be right up against the backside sheetmetal of the hinge pocket, so there's nothing to countersink into. You'd have to use some large-diameter washers with the bolts to keep the bolts from pulling through the sheetmetal. I think it would clear the glass OK....but I haven't actually tried it yet.jzjames wrote:Then you would have to countersink the bolt heads somehow on the inside by the looks of it (for the glass to clear it)...
____| \__
-O-----O- Keith
'67 F-100 2WD SWB ~ '69 F-100 4WD SWB w/7" chop ~ 1975 F-250 Ranger XLT Supercab Camper Special
My '67 restoration video
-> Posting and you! <-a MUST watch for all!!
-O-----O- Keith
'67 F-100 2WD SWB ~ '69 F-100 4WD SWB w/7" chop ~ 1975 F-250 Ranger XLT Supercab Camper Special
My '67 restoration video
-> Posting and you! <-a MUST watch for all!!
-
jzjames
- 100% FORDified!
- Posts: 1785
- Joined: Sun Jan 09, 2005 2:59 pm
- Location: Washington, Windy Point
re: vent window
OK thats right. Man, my mind is wandering on me sometimes these days!
With the bolt heads, the class would clear them maybe. Could you use one of those nice velcro type pads right there ontop of the boltheads to reduce the rattle of the glass against the boltheads? I think there is a one-piece window kit in there somewhere! Hmm.
With the bolt heads, the class would clear them maybe. Could you use one of those nice velcro type pads right there ontop of the boltheads to reduce the rattle of the glass against the boltheads? I think there is a one-piece window kit in there somewhere! Hmm.
-
rjewkes

- 100% FORDified!
- Posts: 3711
- Joined: Sun Apr 17, 2005 1:09 am
- Location: Missouri, Webb City
- Contact:
wasn't custom crew working on this for his crewcab?
If he was i bet he's already tackled the problem.
Keith Your ideas do look straightforward. But i think Custom crew could answere the questions we have.
Could we also maybe just cut out the pockets and tack some nuts to the inside at the original opening and chop the hinge arm down. Then weld on the end a peice that would bolt to that spot?
"It is better to keep your mouth shut and appear stupid than to open it and remove all doubt." - Mark Twain
'70 f250 4x4 Crew cab 460/C6 '72 F100 390/C6 9.8 MPG AVG. '89 Mercury Cougar LS Dual Exh. V6 . 18.9 MPG AVG. In Town.

I don't want to give em a heart-attack. That is what would happen if I answered the door in the buff. Heck it almost scares me to death when I step out of the shower and look in the mirror.~Mancar1~
fuelly.com
'70 f250 4x4 Crew cab 460/C6 '72 F100 390/C6 9.8 MPG AVG. '89 Mercury Cougar LS Dual Exh. V6 . 18.9 MPG AVG. In Town.
I don't want to give em a heart-attack. That is what would happen if I answered the door in the buff. Heck it almost scares me to death when I step out of the shower and look in the mirror.~Mancar1~
fuelly.com
-
71 LONG BED

- 100% FORDified!
- Posts: 1588
- Joined: Wed Jun 14, 2006 7:28 am
- Location: Hamburg, NJ
re: vent window
Seems like a lot of work but it would clean up the lines of the truck big time! 
John Member #1549
71 F100 Sport Custom__________1967 F350 Gone, but not forgotten


71 F100 Sport Custom__________1967 F350 Gone, but not forgotten
-
FORDification
- Site & Forum Admin
- Posts: 8050
- Joined: Sun Jul 11, 2004 12:52 am
- Location: Kansas, Wellsville
- Contact:
You mean like I show in Fig. 6 above and described under the pic?rjewkes wrote:...could we also maybe just cut out the pockets and tack some nuts to the inside at the original opening and chop the hinge arm down. Then weld on the end a peice that would bolt to that spot?
____| \__
-O-----O- Keith
'67 F-100 2WD SWB ~ '69 F-100 4WD SWB w/7" chop ~ 1975 F-250 Ranger XLT Supercab Camper Special
My '67 restoration video
-> Posting and you! <-a MUST watch for all!!
-O-----O- Keith
'67 F-100 2WD SWB ~ '69 F-100 4WD SWB w/7" chop ~ 1975 F-250 Ranger XLT Supercab Camper Special
My '67 restoration video
-> Posting and you! <-a MUST watch for all!!
-
rjewkes
- 100% FORDified!
- Posts: 3711
- Joined: Sun Apr 17, 2005 1:09 am
- Location: Missouri, Webb City
- Contact:
Duh yeah i missed that pic or thought you meant the stub went in the original hole.
But Hey if you didn't already show that one it woulda been original
But Hey if you didn't already show that one it woulda been original
"It is better to keep your mouth shut and appear stupid than to open it and remove all doubt." - Mark Twain
'70 f250 4x4 Crew cab 460/C6 '72 F100 390/C6 9.8 MPG AVG. '89 Mercury Cougar LS Dual Exh. V6 . 18.9 MPG AVG. In Town.
I don't want to give em a heart-attack. That is what would happen if I answered the door in the buff. Heck it almost scares me to death when I step out of the shower and look in the mirror.~Mancar1~
fuelly.com