Ready for a slow rain now.
Wire removal
Moderators: FORDification, Thunderfoot
- wildcard
- Blue Oval Guru

- Posts: 1045
- Joined: Sun Dec 04, 2005 5:40 pm
- Location: Texas
Wire removal
Got the wiper delay installed today. The tutorial is great.  Thanks Keith
  It said to move the black/white wire to the lime green position for the pump to work. It was an easy upgrade. BUT, I had a heck of a time removing the wire from the harness. Still don't know for sure how I got it out to move it except for brute force. Is there an easier way to get them out for future reference ?
Ready for a slow rain now.
Ready for a slow rain now.
- wt4speed#2
- Blue Oval Guru

- Posts: 1064
- Joined: Fri Mar 25, 2005 9:21 pm
- Location: Texas, Ft. Worth
- knightfire83
- Blue Oval Fan

- Posts: 567
- Joined: Thu Mar 02, 2006 8:52 pm
- Location: Nebraska, Lincoln
- Contact:
re: Wire removal
Congratulations on your new wiper delay.  It's the little things that make an everyday drive that more enjoyable.
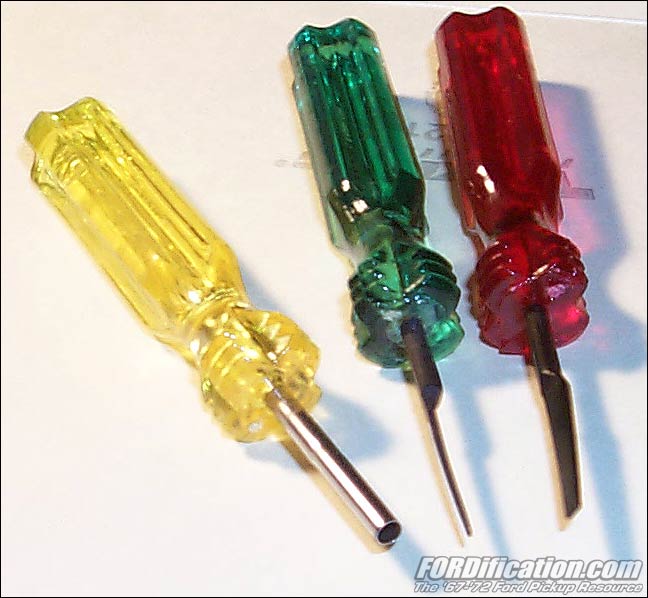
As for the removal process: There is a small locking tab on the metal pin connector on the opposite side of where it makes contact. You can use a small screwdriver to bend this down and then the pin should pull right out of the connector. To install you carefully bend the locking tab back up and insert it back into the connector where it should click and lock in. I'll add a few pictures that I found on the net that may help.
On another note, I too did this conversion but it wasen't working correctly. Found out that since the truck- that the control box came out of had the windows down at the junkyard, rain water found it's way in to the little box. If that happens all you have to do is remove the water soaked little foam piece out of the control box and blow the circuit board dry with compressed air. My delay wipers worked great after that.
You do not have the required permissions to view the files attached to this post.
1974 Ford F-100 4x4- 360 / manual.
1970 Ford F250 4x4 ~ Sold.
1970 Ford F250 4x4 ~ Sold.
- FORDification
- Site & Forum Admin

- Posts: 8050
- Joined: Sun Jul 11, 2004 12:52 am
- Location: Kansas, Wellsville
- Contact:
re: Wire removal
Here are the tools you'd need....about 5 bucks at the local NAPA:


____| \__
-O-----O- Keith
'67 F-100 2WD SWB ~ '69 F-100 4WD SWB w/7" chop ~ 1975 F-250 Ranger XLT Supercab Camper Special


My '67 restoration video
-> Posting and you! <-a MUST watch for all!!
-O-----O- Keith
'67 F-100 2WD SWB ~ '69 F-100 4WD SWB w/7" chop ~ 1975 F-250 Ranger XLT Supercab Camper Special


My '67 restoration video
-> Posting and you! <-a MUST watch for all!!
- wt4speed#2
- Blue Oval Guru

- Posts: 1064
- Joined: Fri Mar 25, 2005 9:21 pm
- Location: Texas, Ft. Worth

