fuel tank swap.(pics)

Post progress reports on your project truck(s)

Moderator: FORDification

Post Reply
User avatar
td
Blue Oval Guru
Blue Oval Guru
Posts: 1007
Joined: Mon Jun 18, 2007 8:44 pm
Location: Tennessee, Lexington

fuel tank swap.(pics)

Post by td »

i thought i'd share my latest project, ive been wanting to do a fuel tank swap for some time now and i finally ordered the mustang tank. i worked on making a new home for it this morning and took a few pics along the way to share. im also going disassemble the rear suspension and add a c-notch while its all apart and clean and coat everything with some por15.

Image


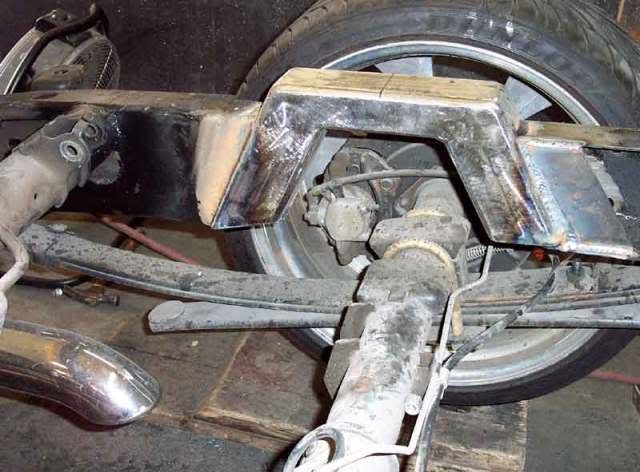
i torched the rivets out of the rear most crossmember and removed it to make room for the tank. i'll add new bracing after the tanks in.


Image


i'll post more pics when the mustang tank arrives and i continue the project.
User avatar
Joshpow
100% FORDified!
100% FORDified!
Posts: 1790
Joined: Fri Jan 21, 2005 10:43 am
Location: Virginia
Contact:

Re: fuel tank swap.(pics)

Post by Joshpow »

Lookin good. Keep us posted. I'd like to do the same thing to mine. How do you plan to run the fill neck?
Josh

72 F-100 Ranger XLT SWB
71 F-100 Custom SWB
67 F-350 Dually Dump
02 F-250 Stroke
http://www.cardomain.com/ride/2972100
User avatar
td
Blue Oval Guru
Blue Oval Guru
Posts: 1007
Joined: Mon Jun 18, 2007 8:44 pm
Location: Tennessee, Lexington

Re: fuel tank swap.(pics)

Post by td »

Joshpow wrote:Lookin good. Keep us posted. I'd like to do the same thing to mine. How do you plan to run the fill neck?
the fill neck on the mustang tanks are at the rear center of the tanks, trying to come from the side creates flow angle problems so it will have to be in the bed floor either center rear or to the drivers side rear of the bed. if i was using a fabed tank with the fill on the side of the tank it would be easier to come from the side of the bed, but the center inlet on this tank makes anything but a bed floor fill a challenge.

i will post more pics as i go ahead with the install :thup:
User avatar
Joshpow
100% FORDified!
100% FORDified!
Posts: 1790
Joined: Fri Jan 21, 2005 10:43 am
Location: Virginia
Contact:

Re: fuel tank swap.(pics)

Post by Joshpow »

Cool. I like that idea anyway. I'd want the neck not showing outside the bed, and center of the rear would be cool. Looking forward to seeing your progress.
Josh

72 F-100 Ranger XLT SWB
71 F-100 Custom SWB
67 F-350 Dually Dump
02 F-250 Stroke
http://www.cardomain.com/ride/2972100
User avatar
My427stang
Blue Oval Fan
Blue Oval Fan
Posts: 502
Joined: Sun Oct 21, 2007 8:52 am
Location: Omaha, NE

Re: fuel tank swap.(pics)

Post by My427stang »

Looks good!
71 F-100 SB 4x4, 461 FE, Edelbrock Pro-flo 4, 4 speed, 4 inch softride lift, all poly bushings, integral PS, most mods installed since the 80's
70 Mustang Sportsroof 489 FE, EFI, TKO-600 5 speed, 4.11s
Engine building by-appointment only--30+ years, specializing in strong street pump gas FEs
User avatar
td
Blue Oval Guru
Blue Oval Guru
Posts: 1007
Joined: Mon Jun 18, 2007 8:44 pm
Location: Tennessee, Lexington

Re: fuel tank swap.(pics)

Post by td »

My427stang wrote:Looks good!

thanks! it'll really start looking better when i get the tank in and get it all coated in some chassis black. tank suppose to show up tomorrow so i'll get it mocked up tomorrow night i hope.
User avatar
Joshpow
100% FORDified!
100% FORDified!
Posts: 1790
Joined: Fri Jan 21, 2005 10:43 am
Location: Virginia
Contact:

Re: fuel tank swap.(pics)

Post by Joshpow »

Looking forward to seing it get in there. I want to see what it looks like and how hard it is. I may do one for the 72 if I think I can tackle it without problems.
Josh

72 F-100 Ranger XLT SWB
71 F-100 Custom SWB
67 F-350 Dually Dump
02 F-250 Stroke
http://www.cardomain.com/ride/2972100
User avatar
td
Blue Oval Guru
Blue Oval Guru
Posts: 1007
Joined: Mon Jun 18, 2007 8:44 pm
Location: Tennessee, Lexington

Re: fuel tank swap.(pics)

Post by td »

well the tank came in but i didn't get it mocked into place yet, I'm going to have to trim 1/4'' off each inside edge of the lower lip on the frame before the tank will fit into its new home. I'll have more time tomorrow to break out the torch and get it in place. as for some good news the fill neck isn't angled like some of the mustang tanks Ive seen pics of, so i wont have to modify it to get it coming straight up towards the bed floor.

pics soon to come........ :thup: :thup:
User avatar
dablack00
Blue Oval Fan
Blue Oval Fan
Posts: 695
Joined: Wed Jan 12, 2005 7:32 am
Location: Texas, Lufkin

Re: fuel tank swap.(pics)

Post by dablack00 »

I don't know how much lower the fill neck will be than the bumper, but on my 68 cougar (same as a mustang), the fill was behind the plate. The plate was mounted on a spring loaded hinge and you just pulled it down and there was the gas cap. Actually now that I think about it, I would think the top of the tank would be higher than bumper so never mind but it is something to think about.
User avatar
td
Blue Oval Guru
Blue Oval Guru
Posts: 1007
Joined: Mon Jun 18, 2007 8:44 pm
Location: Tennessee, Lexington

Re: fuel tank swap.(pics)

Post by td »

dablack00 wrote:I don't know how much lower the fill neck will be than the bumper, but on my 68 cougar (same as a mustang), the fill was behind the plate. The plate was mounted on a spring loaded hinge and you just pulled it down and there was the gas cap. Actually now that I think about it, I would think the top of the tank would be higher than bumper so never mind but it is something to think about.
your right it will be higher than the bumper, but thanks for the thought!
User avatar
marz68
Blue Oval Guru
Blue Oval Guru
Posts: 1387
Joined: Sat Dec 03, 2005 2:25 am
Location: California, Northridge
Contact:

Re: fuel tank swap.(pics)

Post by marz68 »

I like watching people cut up there trucks :drool: what type of notch are you going to use a 3 pice or a fully boxed one.
Here are some pics of a notch that was made out of 3x3x1/4 and 2x3x1/4.
This one customer upgraded to a super notch so that he can tuck 24's.
Image

Image

Image
Image
User avatar
td
Blue Oval Guru
Blue Oval Guru
Posts: 1007
Joined: Mon Jun 18, 2007 8:44 pm
Location: Tennessee, Lexington

Re: fuel tank swap.(pics)

Post by td »

Marz,

i haven't quit made up my mind on how much of a notch im gonna do, the frame does hit in normal driving conditions time to time so the least i'll go with is 4'' or so but if im going to get wilder with the suspension mods i'll need to use more of a notch. im leaning towards leaving the setup the way it is do to the lack of funds and im learning that no matter what you've got or how you have it setup its never enough or you find yourself wanting something better. so i think im gonna call it quits on the suspension and just leave it as is and put what expendable income i do have towards improving other aspects of the truck. :thup:

i have the next 11 days off so i'll be getting a lot done on the tank swap and cleaning up the frame and axle.
427blackpearl
Preferred User
Preferred User
Posts: 462
Joined: Tue Nov 27, 2007 10:29 pm
Location: Tennessee, Knoxville

Re: fuel tank swap.(pics)

Post by 427blackpearl »

i need to do the same to pearl too. so mess up cause ill use this as a guide fo mine. did you say 11 day off?
User avatar
td
Blue Oval Guru
Blue Oval Guru
Posts: 1007
Joined: Mon Jun 18, 2007 8:44 pm
Location: Tennessee, Lexington

Re: fuel tank swap.(pics)

Post by td »

427blackpearl wrote:i need to do the same to pearl too. so mess up cause ill use this as a guide fo mine. did you say 11 day off?

Brad,

yea im off today thru the 1st of Dec. im headed to the shop now to get a fire started and warm it up in there a little so i can get started today! :woohoo:
User avatar
td
Blue Oval Guru
Blue Oval Guru
Posts: 1007
Joined: Mon Jun 18, 2007 8:44 pm
Location: Tennessee, Lexington

Re: fuel tank swap.(pics)

Post by td »

well i worked on the bump most of the day and i don't know if it looks like it or not but i got a lot done. i did all the trimming that was necessary to fit the tank between the frame rails and drilled all the mounting holes, cut some rubber strips to go between the tank and rails and mounted it up loosely then removed it all for the cleaning and painting. ive got to round up the metal for the c-notch and get it in before i can coat it all.


here'a shot of the tank in its new home.

Image

here's the frame after the springs and axle were removed.

Image

here's the axle, i still have to take the parts off it before cleaning it up for paint.

Image


i almost forgot to mention that right before i took it all apart me and my boy went down the road and did 2 or 3 or 6 :lol: big smoky burn outs with the bed off and the old junky tires on it.

more to come as i go.
Post Reply